This is my solution to turning bottle stoppers. It originally
appeared as an article in More Woodturning a couple years ago...
|
|
This is my solution to turning bottle stoppers. It originally
appeared as an article in More Woodturning a couple years ago...
|
|
The first attempt usually seems to entail drilling a blank, gluing in a dowel, then trying to grip it with either a Jacob's chuck or an appropriately sized 4-jaw chuck. The shortcoming of this approach is amply evidenced the first time a good sound catch occurs. The dowel often snaps, ruining the blank. When the work is successfully completed on the lathe, it still has to have a cork attached. Rarely will the dowel be the exact length of the cork; consequently, the end must be sanded after the glue is dry.
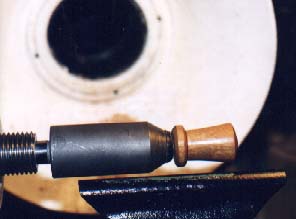
After much thought (and some very helpful input from others) I've come up with a simple solution that addresses both these problems. The easiest way to mount a blank is to predrill it with a 3/8" hole about an inch deep, then mount it on a simple screw chuck. The screw holds securely during the worst of catches, and the hole is the proper diameter for the dowels. I cut the dowels to about 2" because the corks are around one and a quarter inches long. This permits about 3/4" to be inserted into the stopper.
To prepare the corks, I put a bit of cyanoacrylate glue on the dowel and insert it into the cork. If the cork is held flat on the workbench, the dowel will bottom out flush with the end, eliminating the need to sand the cork and dowel flush. After the stopper is turned I put some medium cyanoacrylate glue in the hole and slide in a cork assembly.
In considering what I wanted in a screw chuck, several things came to
mind. One, I wanted it to fit the #2 Morse taper of my headstock.
I like unobstructed access from both ends when I do center work, and I
wanted to be able to mount and dismount the chuck simply and quickly.
Additionally, I wanted to have a 7/16" screw. Since the hole drilled
in the blank is 3/8", a 7/16" thread offers 1/32" of grip which although
it sounds minimal is more than enough. I also wanted the chuck to
taper to around an inch on the end. Since corks are about 7/8" wide
at the large end, a one inch diameter on the chuck would provide an easy
visual guide for sizing the blank.

I originally drew up some plans and took them to a machine shop where
I was told that it would cost about $50 or $60 for the work. That
was quite a bit more than I was looking to spend, however the machinist
suggested a much cheaper solution: a 1/2" end-mill holder. These
come in many different flavors, including a #2 Morse taper.
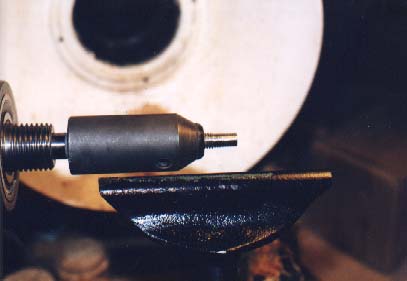
I ordered one from Enco (800 873-3626, part number 210-1226, $15.49). The holder I received had a gradual taper (about 45 degrees) on the end where it terminated with a one inch diameer. (This is a more gradual taper than the one shown in the catalog however. Should you order one it may differ from the one in the accompanying photos.)

After receiving the holder, I contacted a friend with a metal lathe
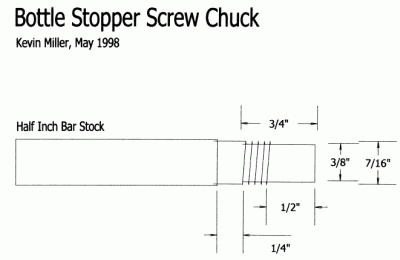
to machine the screw which was simplicity itself. We took a 3" x
1/2" steel rod and turned it down to 7/16" for about an inch. We
then threaded about 3/4" of that section with a 7/16" x 14 die. I don't
know if this is a course or fine thread - its just what Pete had on hand.
Following that, I had about a half inch milled down to 3/8". This
acts as a guide when inserted into the hole drilled for the dowel.
I inserted the rod into the end-mill holder until the step aligned with the front of the holder. The rod is held in place with a hexgrub screw. Note that there is about a quarter inch between the face of the end-mill holder and the end of the threads. That is by design.
At the hardware store I picked up 3 fiberglass washers with an outside
diameter of 1" and inside diameter of 7/16". I slid these over the
unthreaded portion of the exposed rod to act as a sacrificial element for
those times when I'm truing up the bottom of the stopper blank. The
fiberglass cuts away easily without damaging the edge of the tool - something
the hardened steel of the end-mill holder isn't likely to do! Depending
on where your threads end, you may have to add more washers to insure that
the blank can snug up firmly.

I was very pleased when I put the contraption into the lathe to give
it a whirl. The end-mill holder ran quite smoothly, and offered ample
access at the headstock end. On some harder woods it can take a firm
grip to screw the blank onto the screw which is why I recommend as fine
a thread as possible. I found that a little beeswax helped a lot
for the tight pieces.
For a bit over $16 or $17 and a walnut stopper (which I dropped off
at my friend Pete's to show my appreciation) I had a first class stopper
chuck.
| Home | The Present | The Family & Stuff | Cool Links (IMHO) |
| Closed Forms | Canisters | Misc. Thingies | The Shopsmith Years |
| Bowls | Shop Stuff | Projects |